
Oil Cooler Setup
Cam takes a stab on getting an oil cooler on the C5 without too much modification.
Setrab Oil Cooler Mount and Kit
What this is
I needed an oil cooler, ASAP. Unfortunately for me, oil cooler kits for the C5 cost an arm and a leg! This kit turned out to be sort of spendy, but now you, the reader, can benefit from my trial and error. The brackets I've developed use the radiator support structure as a mounting location, and feed the in/out lines through the radiator shroud.
What you need
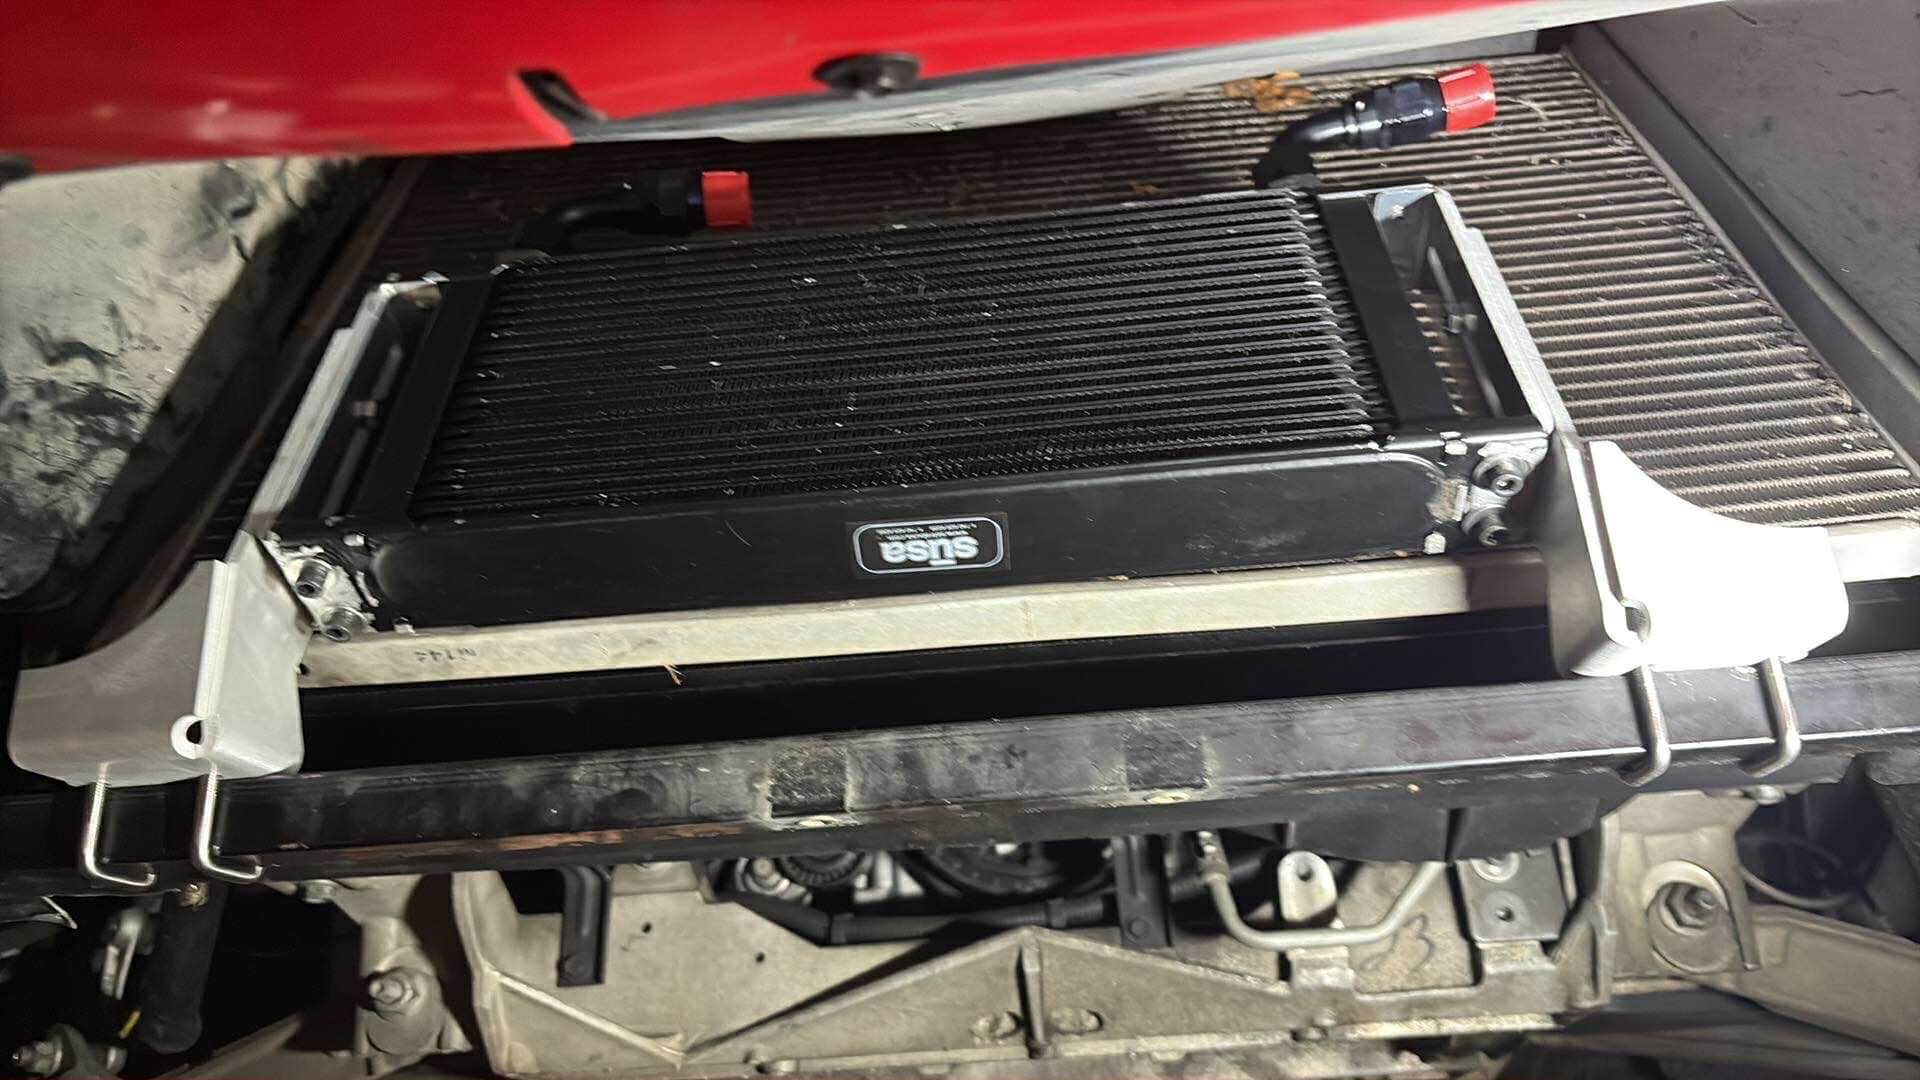
So, hypothetically, this mounting style can apply to any oil cooler. I specifically designed this setup for the Setrab 50-920-7612, but the inner plate can be adjusted to suit any distance between the mounting flanges of any cooler. The 50-920-7612 is 16" wide, but you can definitely fit a wider cooler in the area directly in front of the condenser. Ok, here's the list:
- 1x Setrab 50-920-7612
- 2x Setrab 22-M22AN10-90 ProLine Oil Cooler Adapter Fitting
- 2x Setrab 22-M22-AN10-SE ProLine Oil Cooler Adapter Fitting
- 15' of AN10 braided PTFE hose (I didn't use it all, but I believe the line lengths are more than 10' combined...)
- 4x MATCHING BRAND PTFE AN10 hose female ends - You will need at least 1 90 and 1 60 angled fittings!
- Any brand LS oil thermostat adapter (and new gasket)
- Slimmer motor mounts - AMT, Hawk Motorsports, etc. (Potentially unnecessary?)
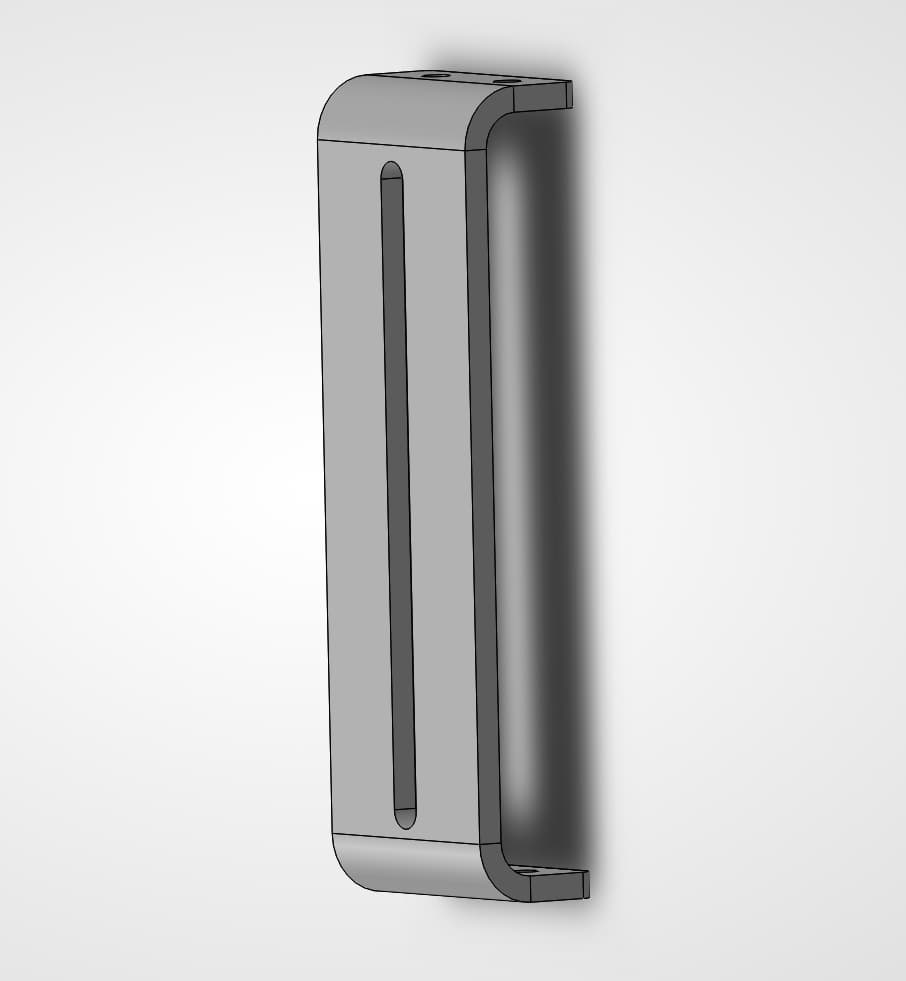
- 2x Inner bracket; 3/16" 5052-H32 Aluminum millsymotorsports.com/free-parts
- 2x Outer bracket; 3/16" 5052-H32 Aluminum
- 10AN hose bracket Amazon
- 8x M6 x 10mm SHCS
- 6x M6 x 18mm FHCS OR M6 x 25mm SHCS
- 8x M6 washers
- 22x M6 flange nuts
- 27mm/1.06" inner width square u bolts, M6 threads Amazon
- Blue threadlocker
- Step bits for modifying radiator shroud
- Tools for cutting SS braided PTFE hose
- Razor to trim front air dam
- Optional: Dampening material that fits between the bracket halves.
Once I get another car to install this kit on again, more/better pictures will be present. If you follow this guide and install it on your car, take pictures so I can post them here! It’ll help out someone else. The outer brackets here don’t exactly match mine, but I modified the design a little further to make it easier to install. Also, check out shredjesse.com or c5corvettes.com for another good instructional!
What to do
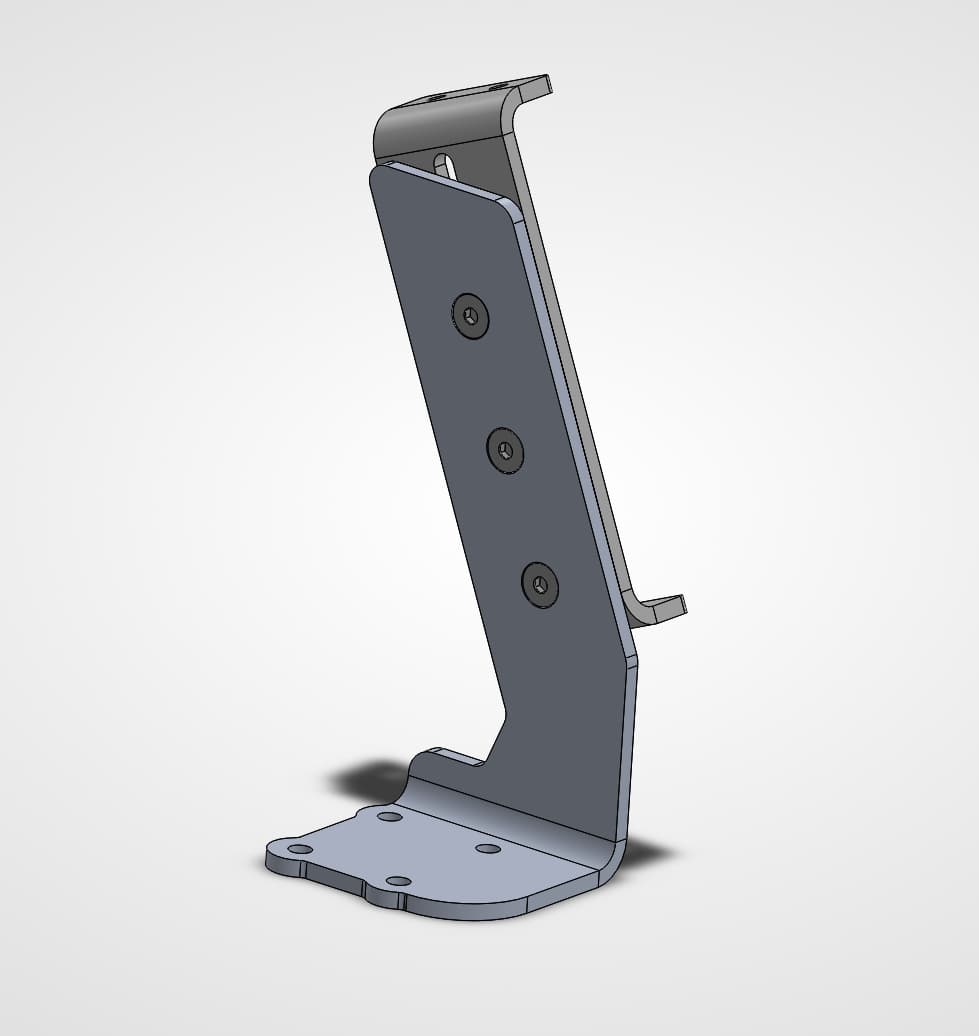
Ok, the basic premise of this is the cooler is mounted on the crossmember of the radiator support bracket - and the lines run out of the side of the radiator shroud. I started this install mocking up the oil cooler on the crossmember. Start with securing the inner bracket to the Setrab - this would be the inner brackets:
Some blue threadlocker goes a long way here.”Good and tight” or German spec torque should work here - finger tight as best you can, then another ¼-½ turn the rest of the way with a wrench. Now, install the outer bracket to the inner bracket. Since the inner bracket uses a slot, the vertical position of the oil bracket isn’t super important right now - the position is finalized when the oil cooler is on the car. You’ll use the M6 flat head cap screws here.
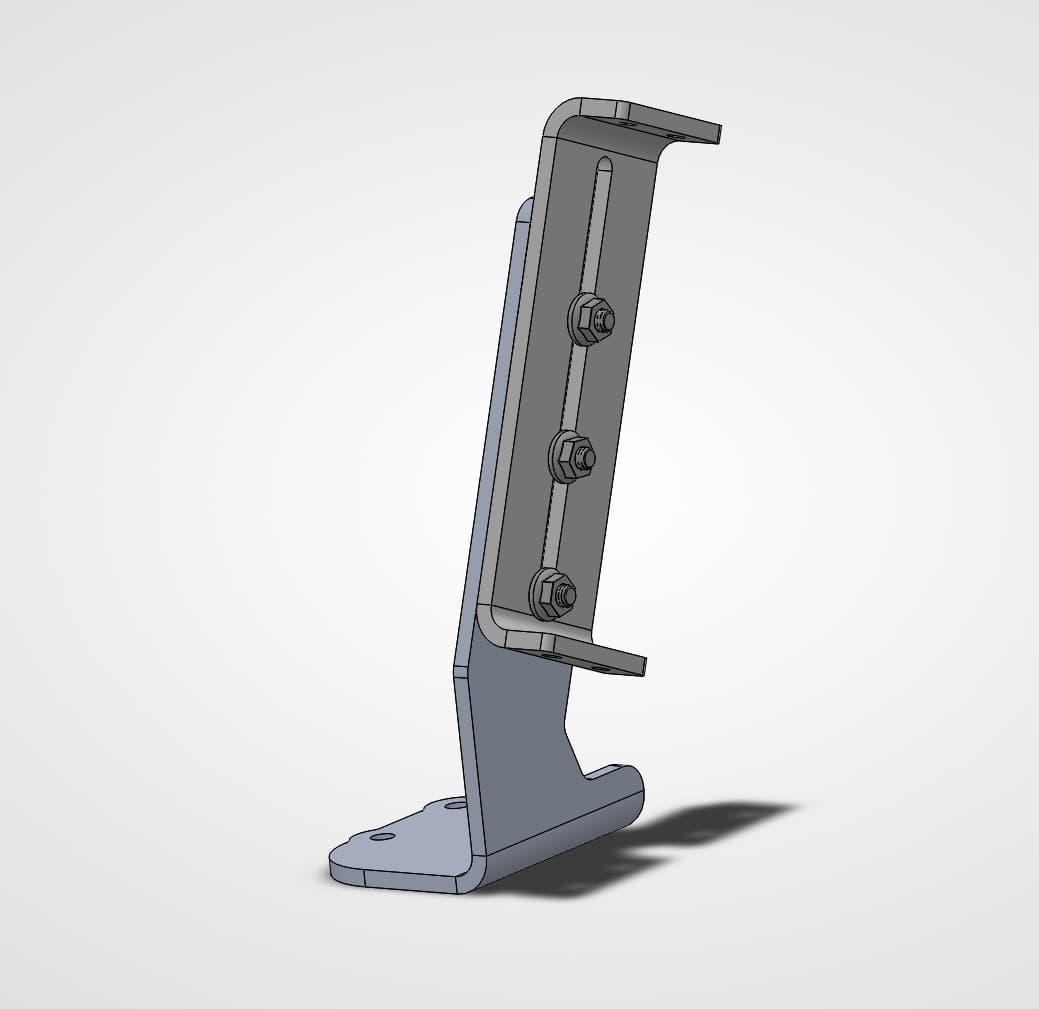
Repeat the previous 2 steps again for the other side of the oil cooler. Now, carefully place the oil cooler assembly on the crossmember. Another pair of hands here makes this safer, but it is possible to do by yourself. Some small step over or bar clamps help a lot if you’re by yourself. After you’ve got the cooler in position, slide a u bolt up through the holes of the clamp like this:
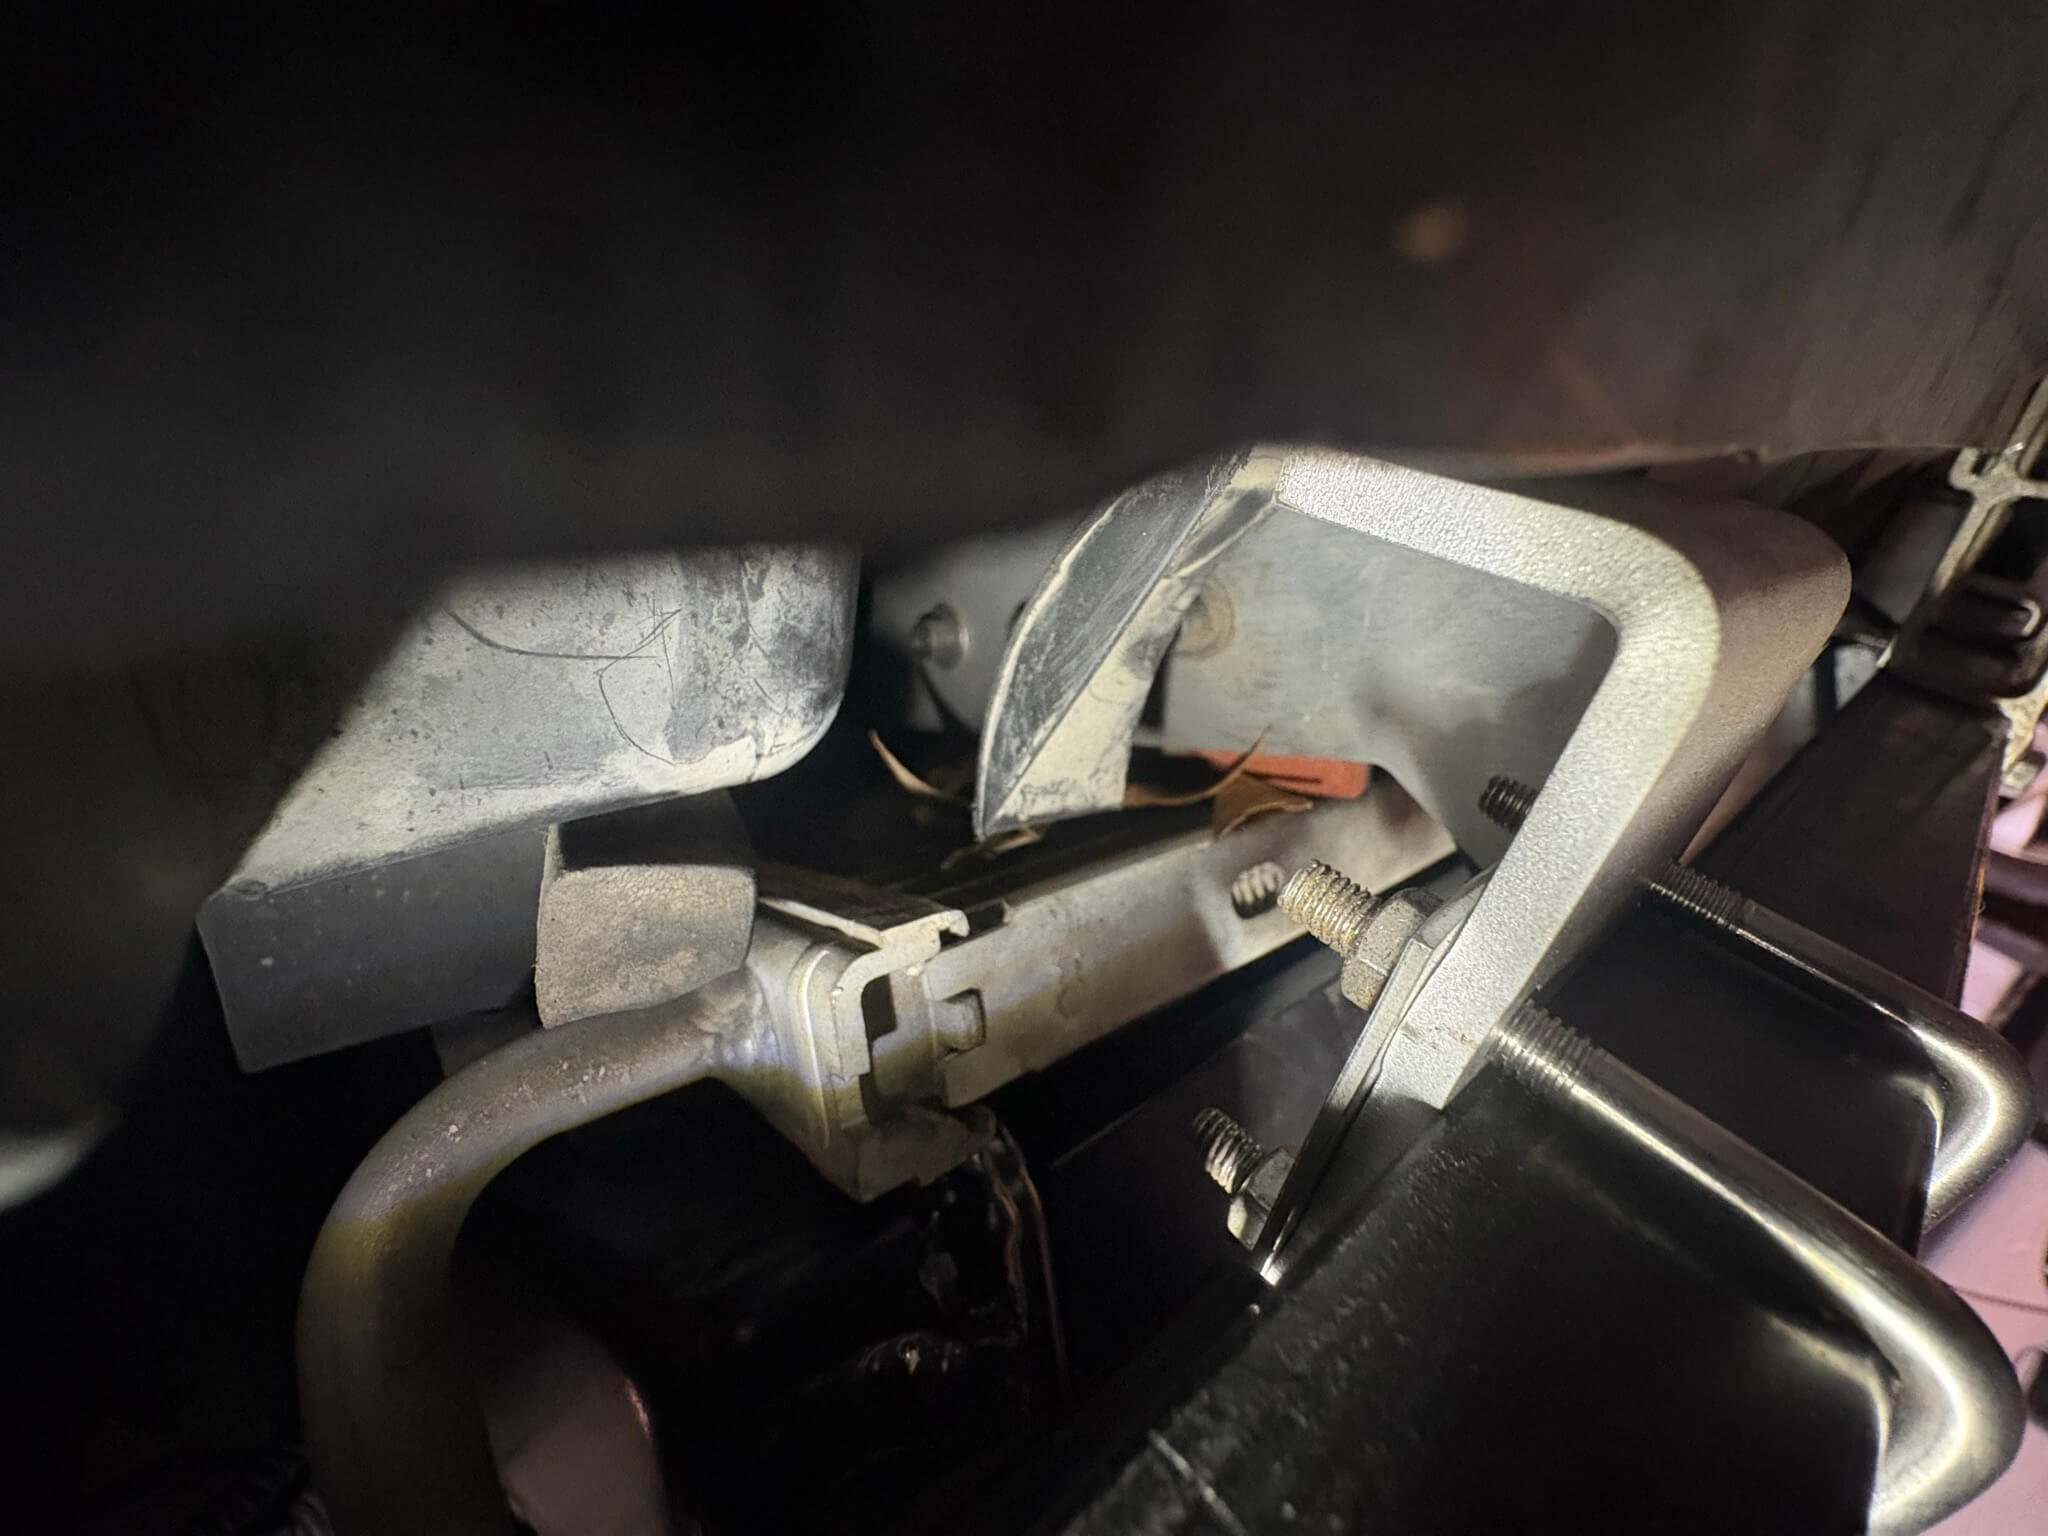
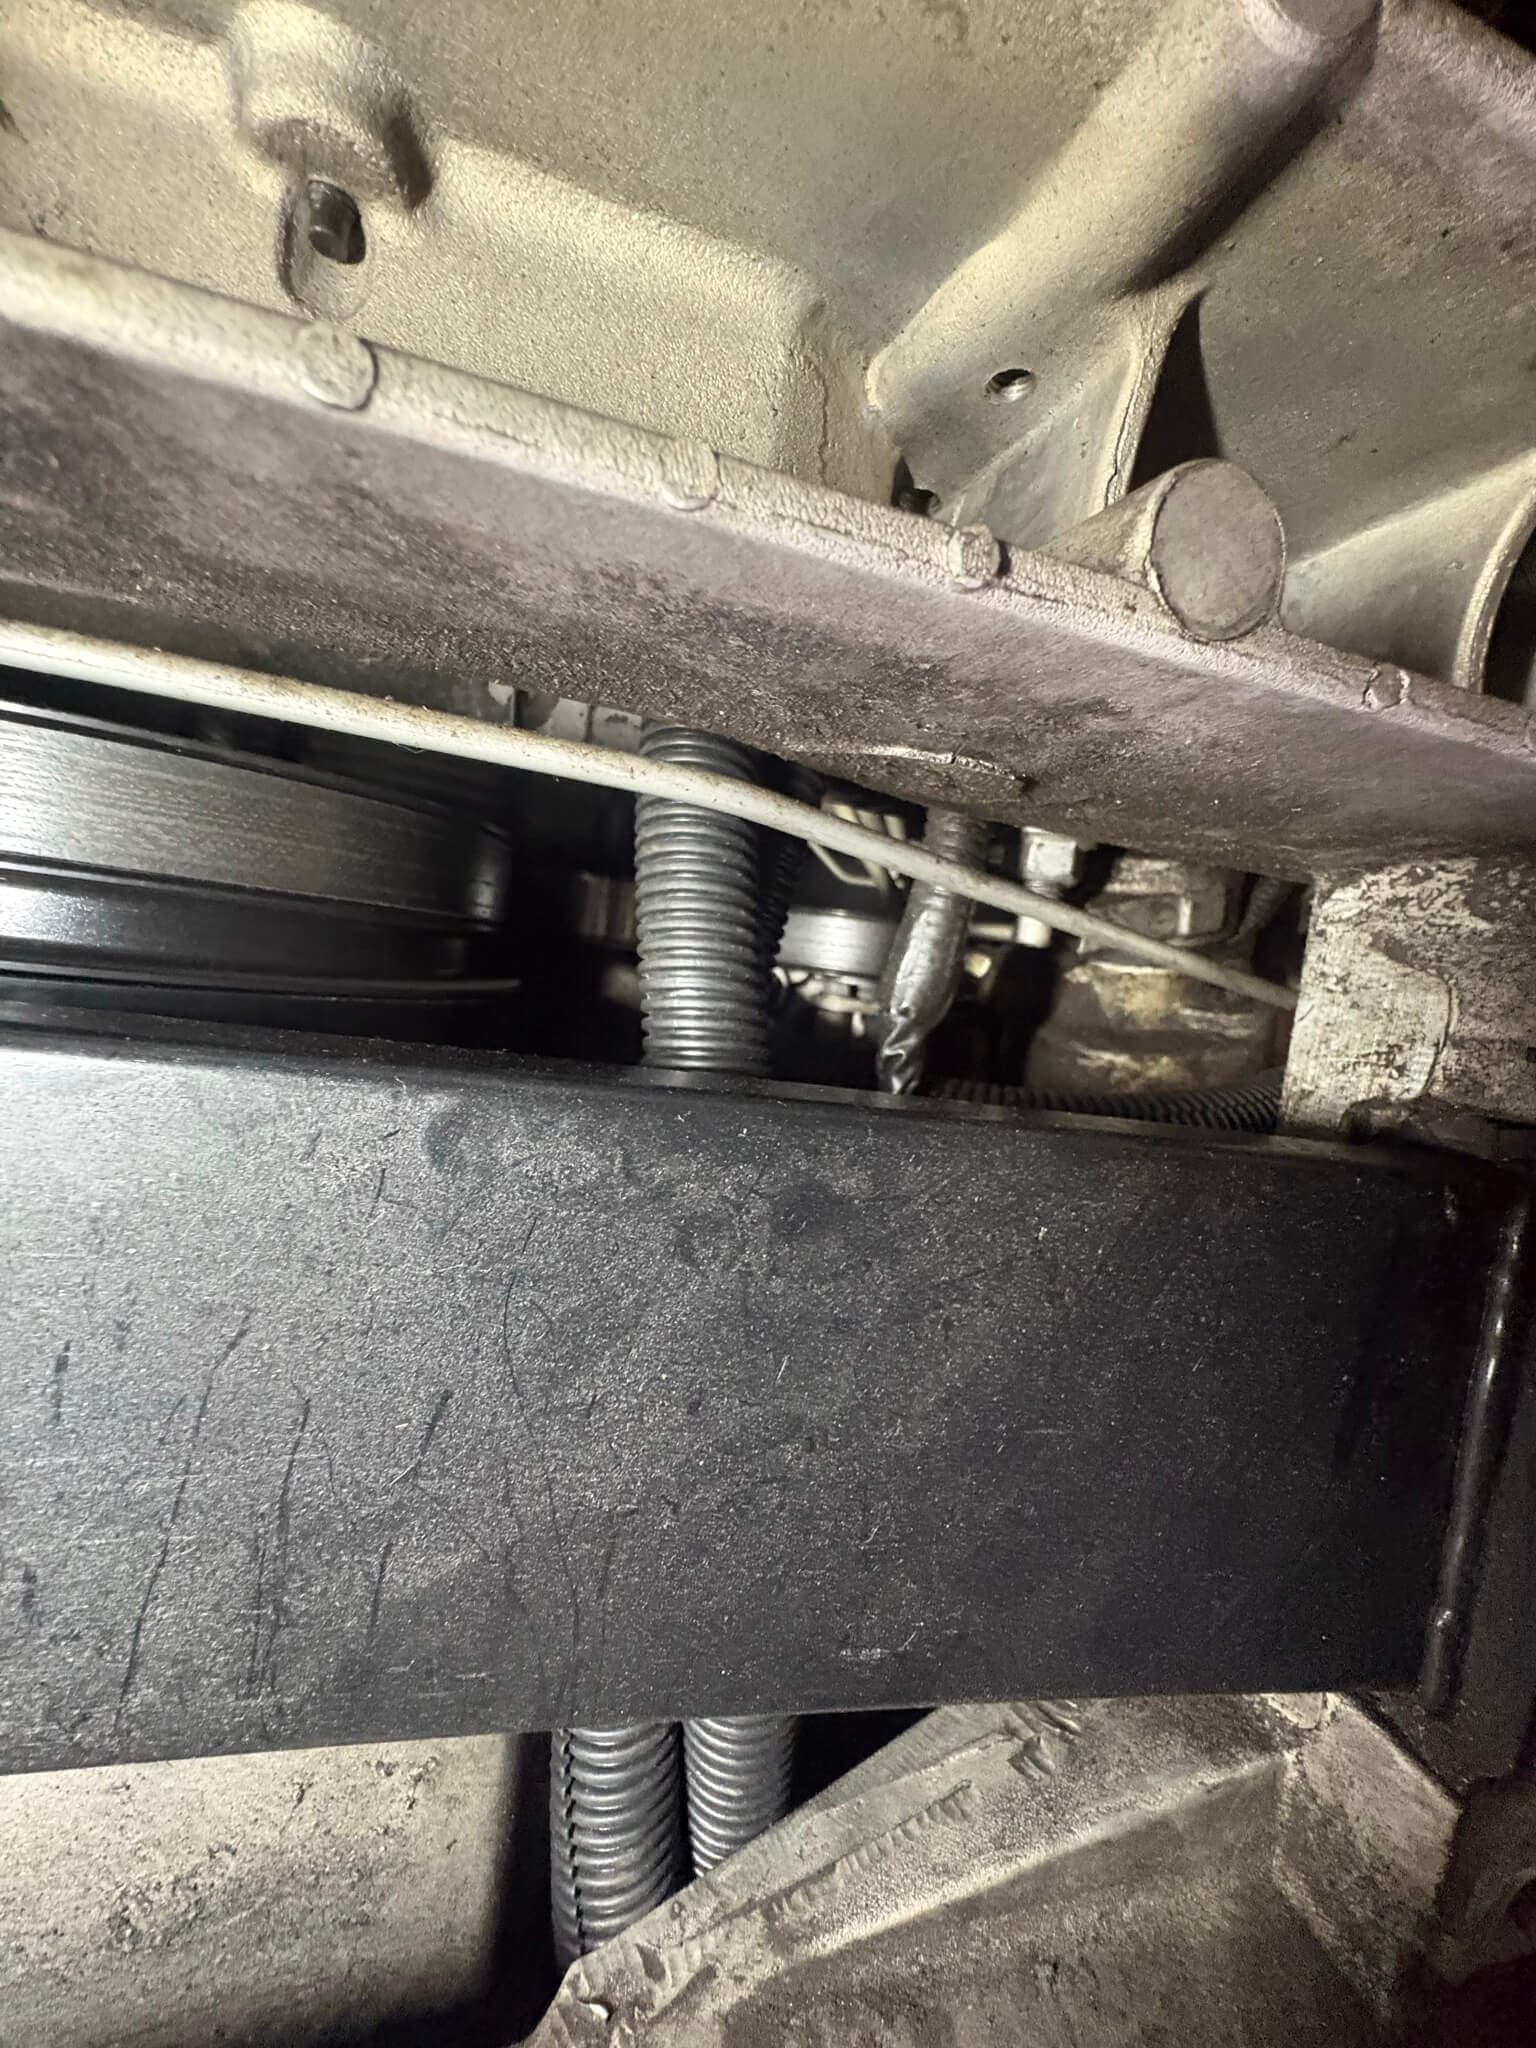
Use some blue threadlocker on the nuts, and use the washer plate provided with the u bolts. This might be sort of tedious as there’s not a lot of space here. Fasten with the same method as the bracketry. Repeat this process 3 more times - leave everything loose enough to move the cooler assembly around if you need to! Then tighten. Depending on your exhaust setup, there may or may not be enough room here. I’m using Speed Engineering headers and their x pipe, and I actually had a decent amount of room to install the oil thermostat adapter block. This is located near the oil filter:
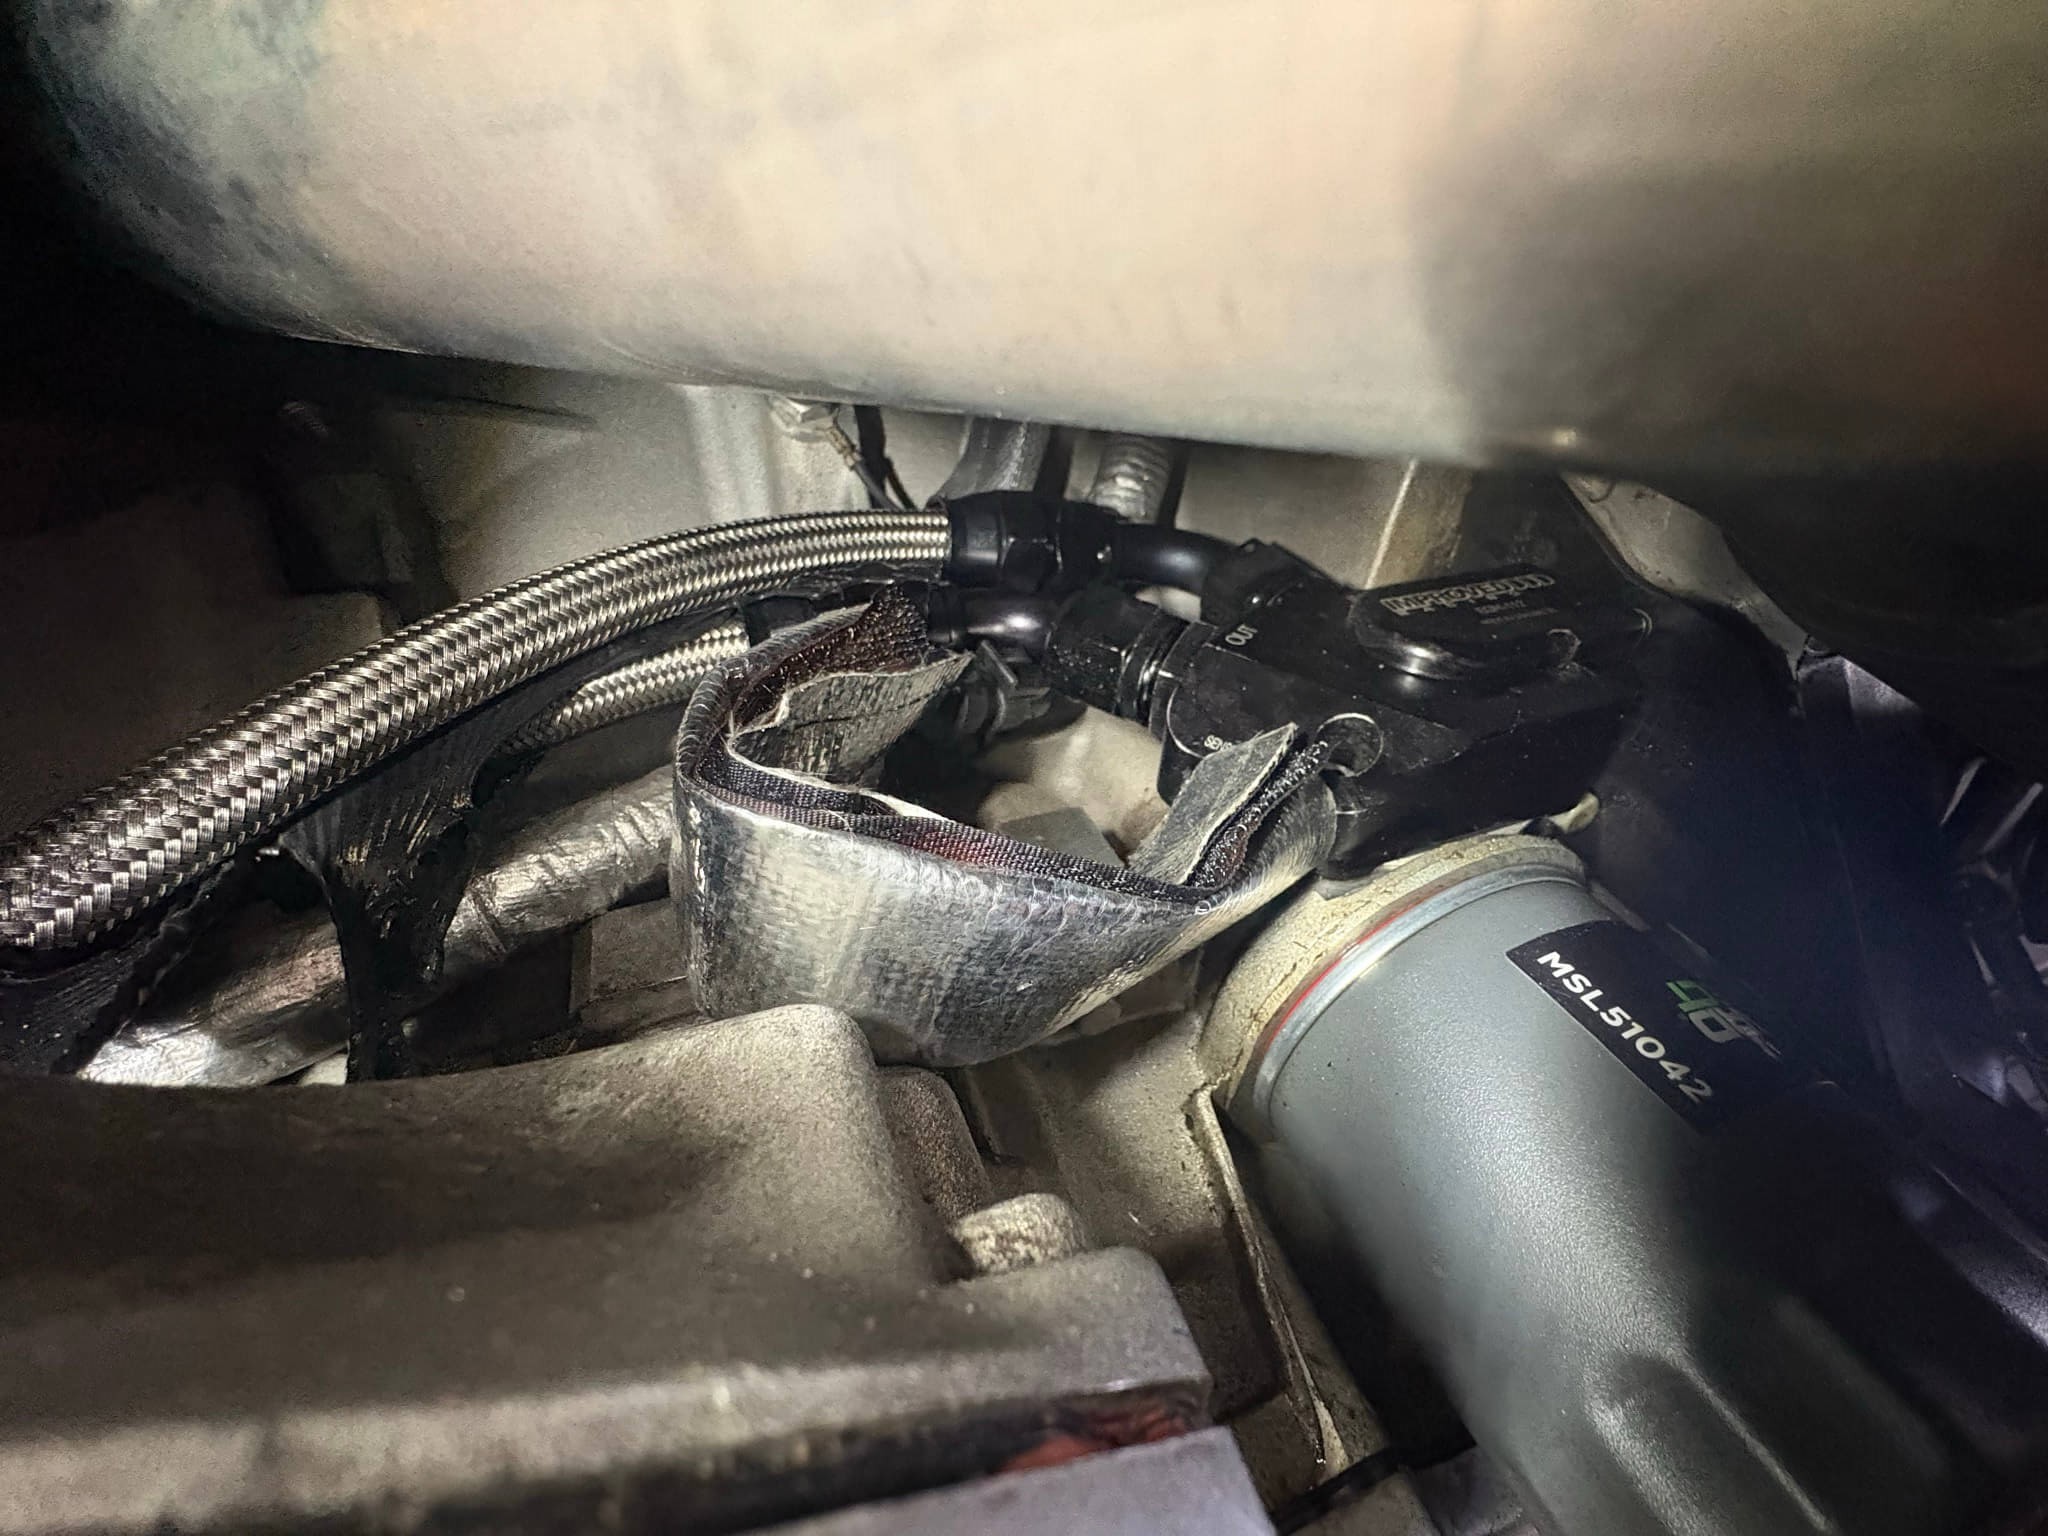
There should be 2 bolts that secure the stock oil thermostat to the block. Remove those and gently remove the block. I would definitely use a new gasket! This is the sort of tedious part - installing your new adapter block. Just be patient and fish it up there. Make sure the gasket is in the correct position and doesn’t slip out from the mating surfaces. Use the specified torque spec for your year and model - I’m not sure if they differ. For my 2003, I used 9 foot pounds. Maybe throw some blue threadlocker on the threads to be safe! Ok, next are the lines. These can also be rather tedious. Some lower profile motor mounts might be necessary - I installed this cooler only after I changed my mounts, and routed the lines around them. Since the cooler can slide around on the crossmember to a position you prefer, I won’t list line lengths; rather, you should cut your first line after running it to the cooler. After you cut your first line, the second line will be shorter or longer, depending on which orifice in the cooler you ran yours to first. To do this, find the general height that matches the position of the fittings you’re going to use.
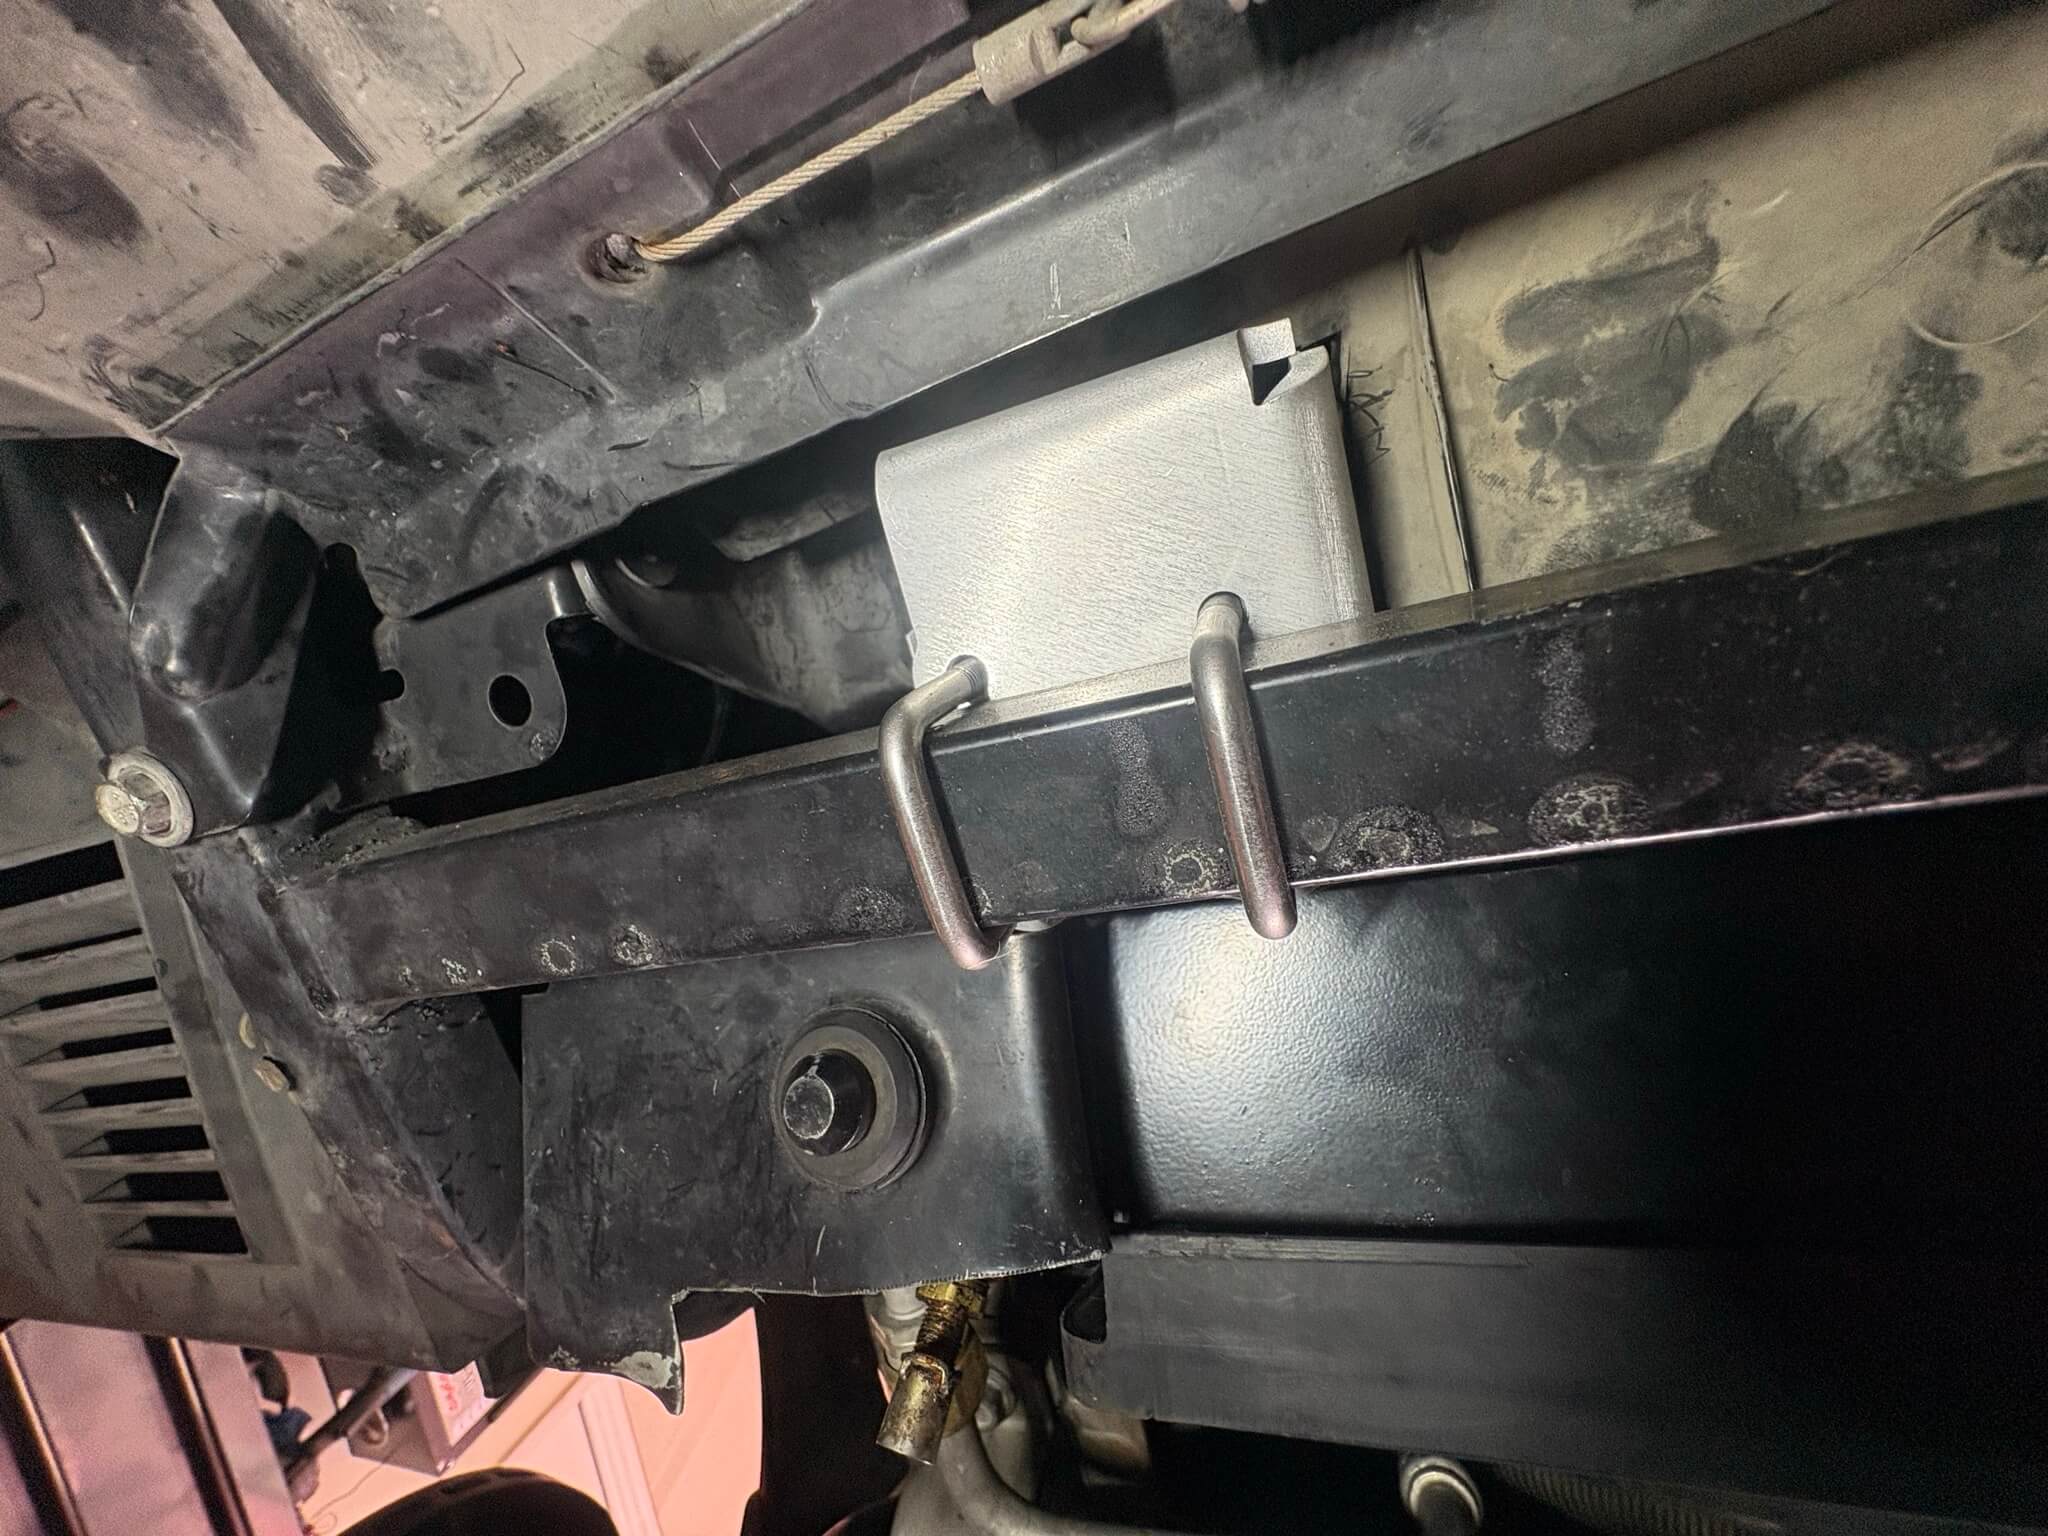
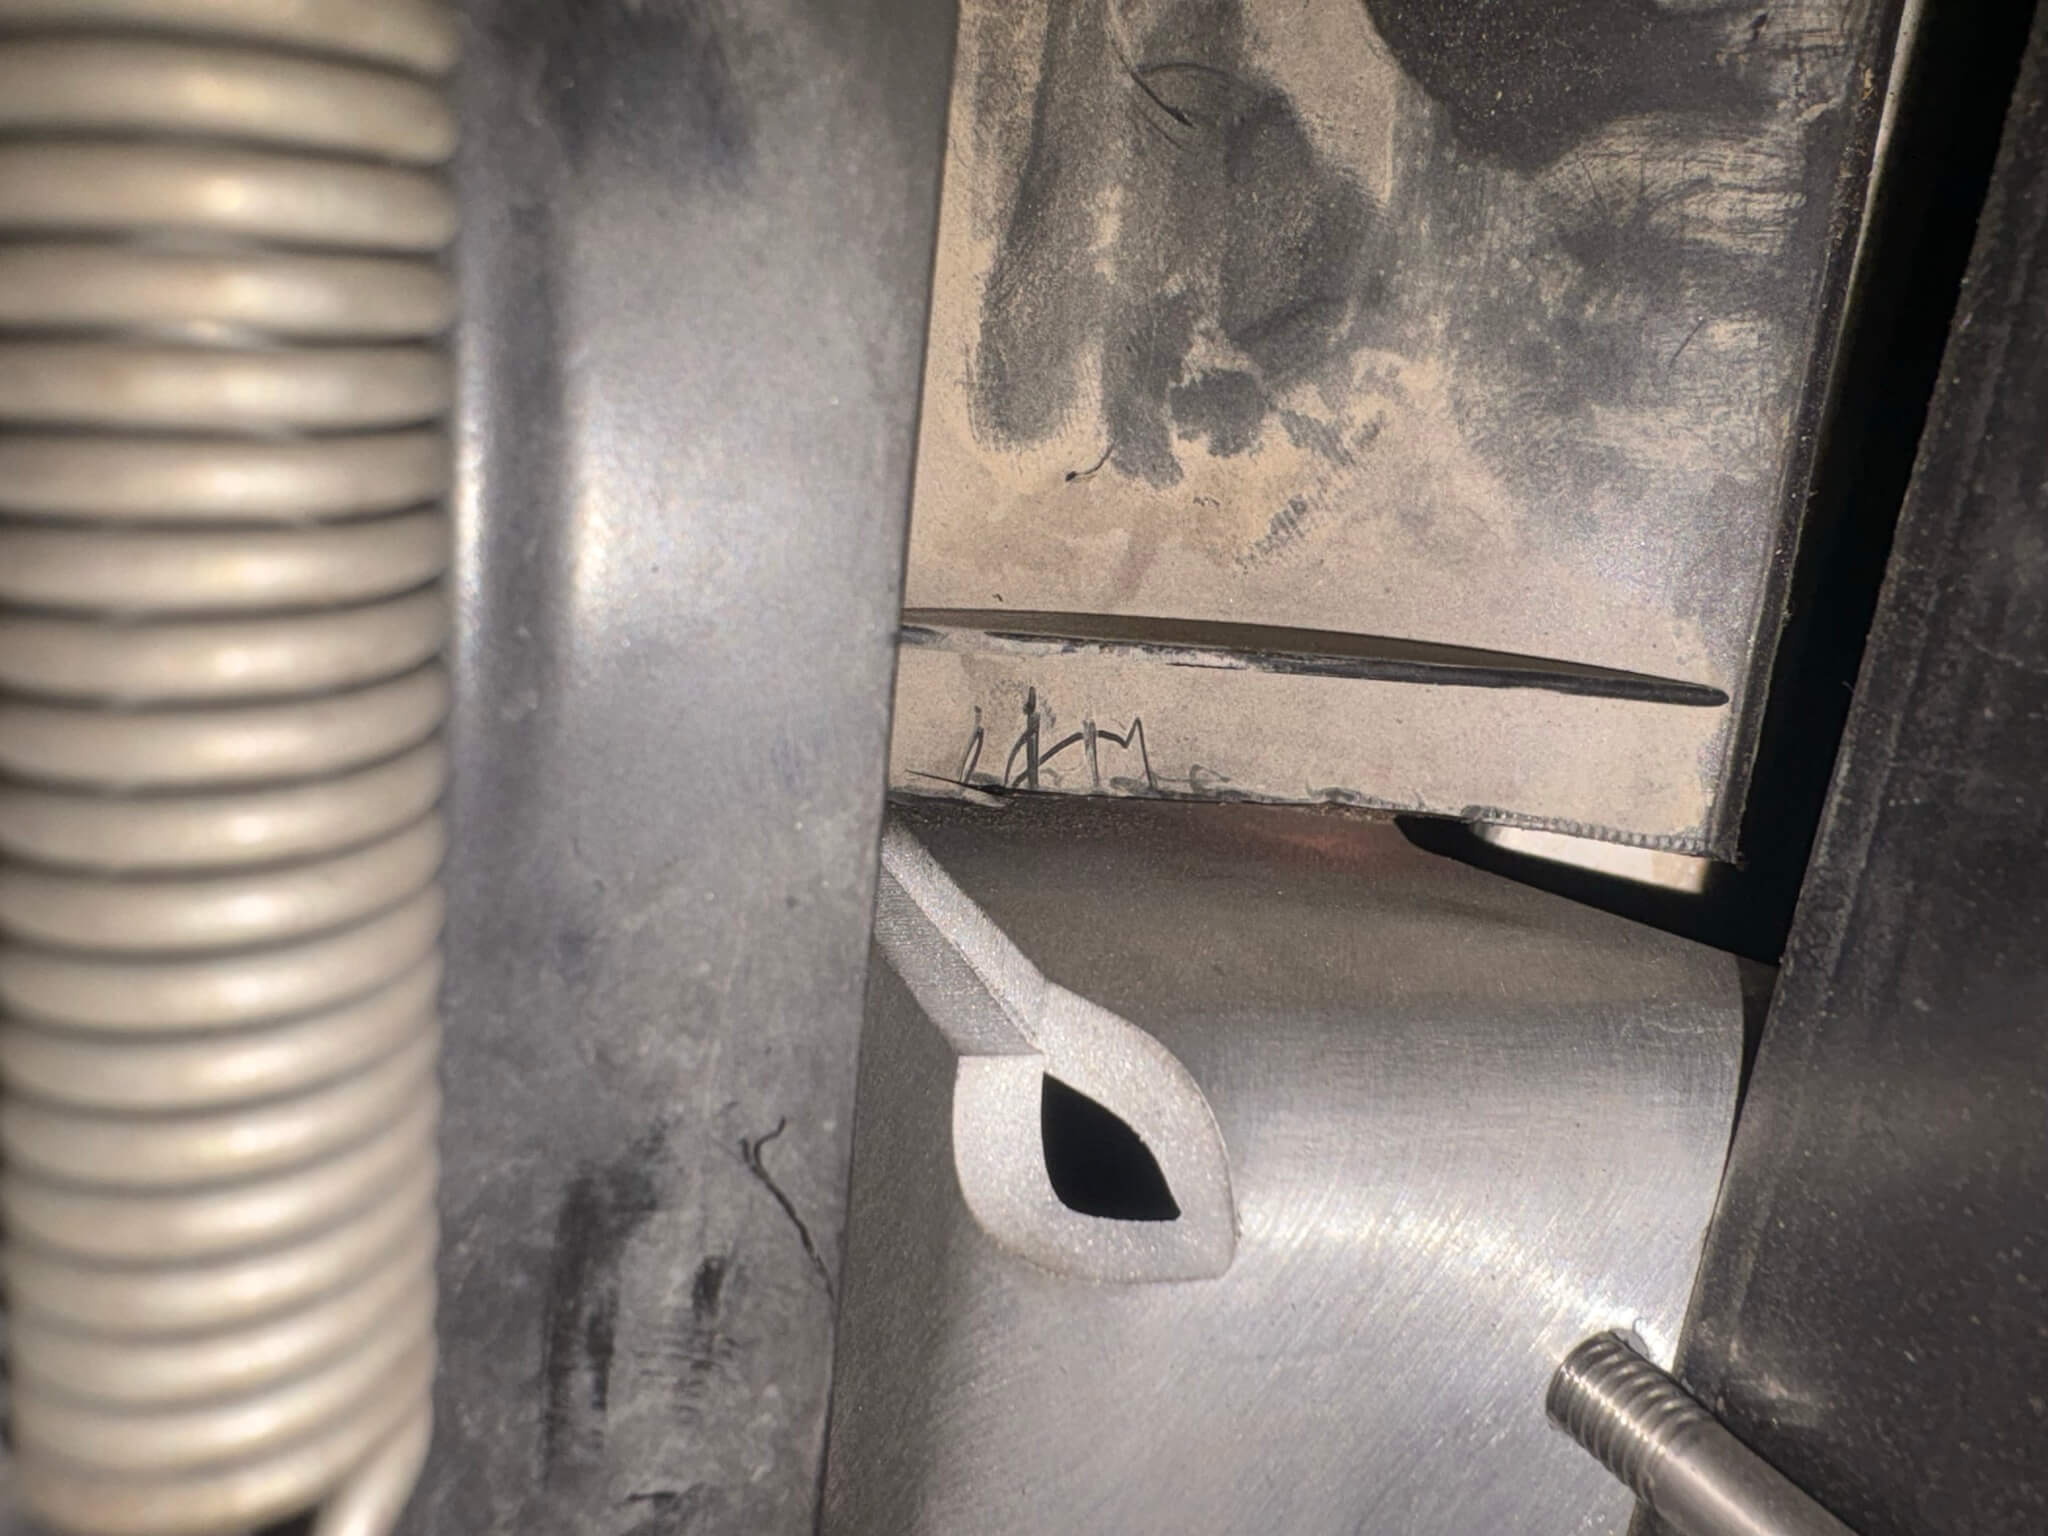
 After using the step bit (and maybe a razor) to make an outlet through the radiator shroud, start by feeding the AN line near the thermostat block. I’ll post a bunch of images here of how I routed mine:
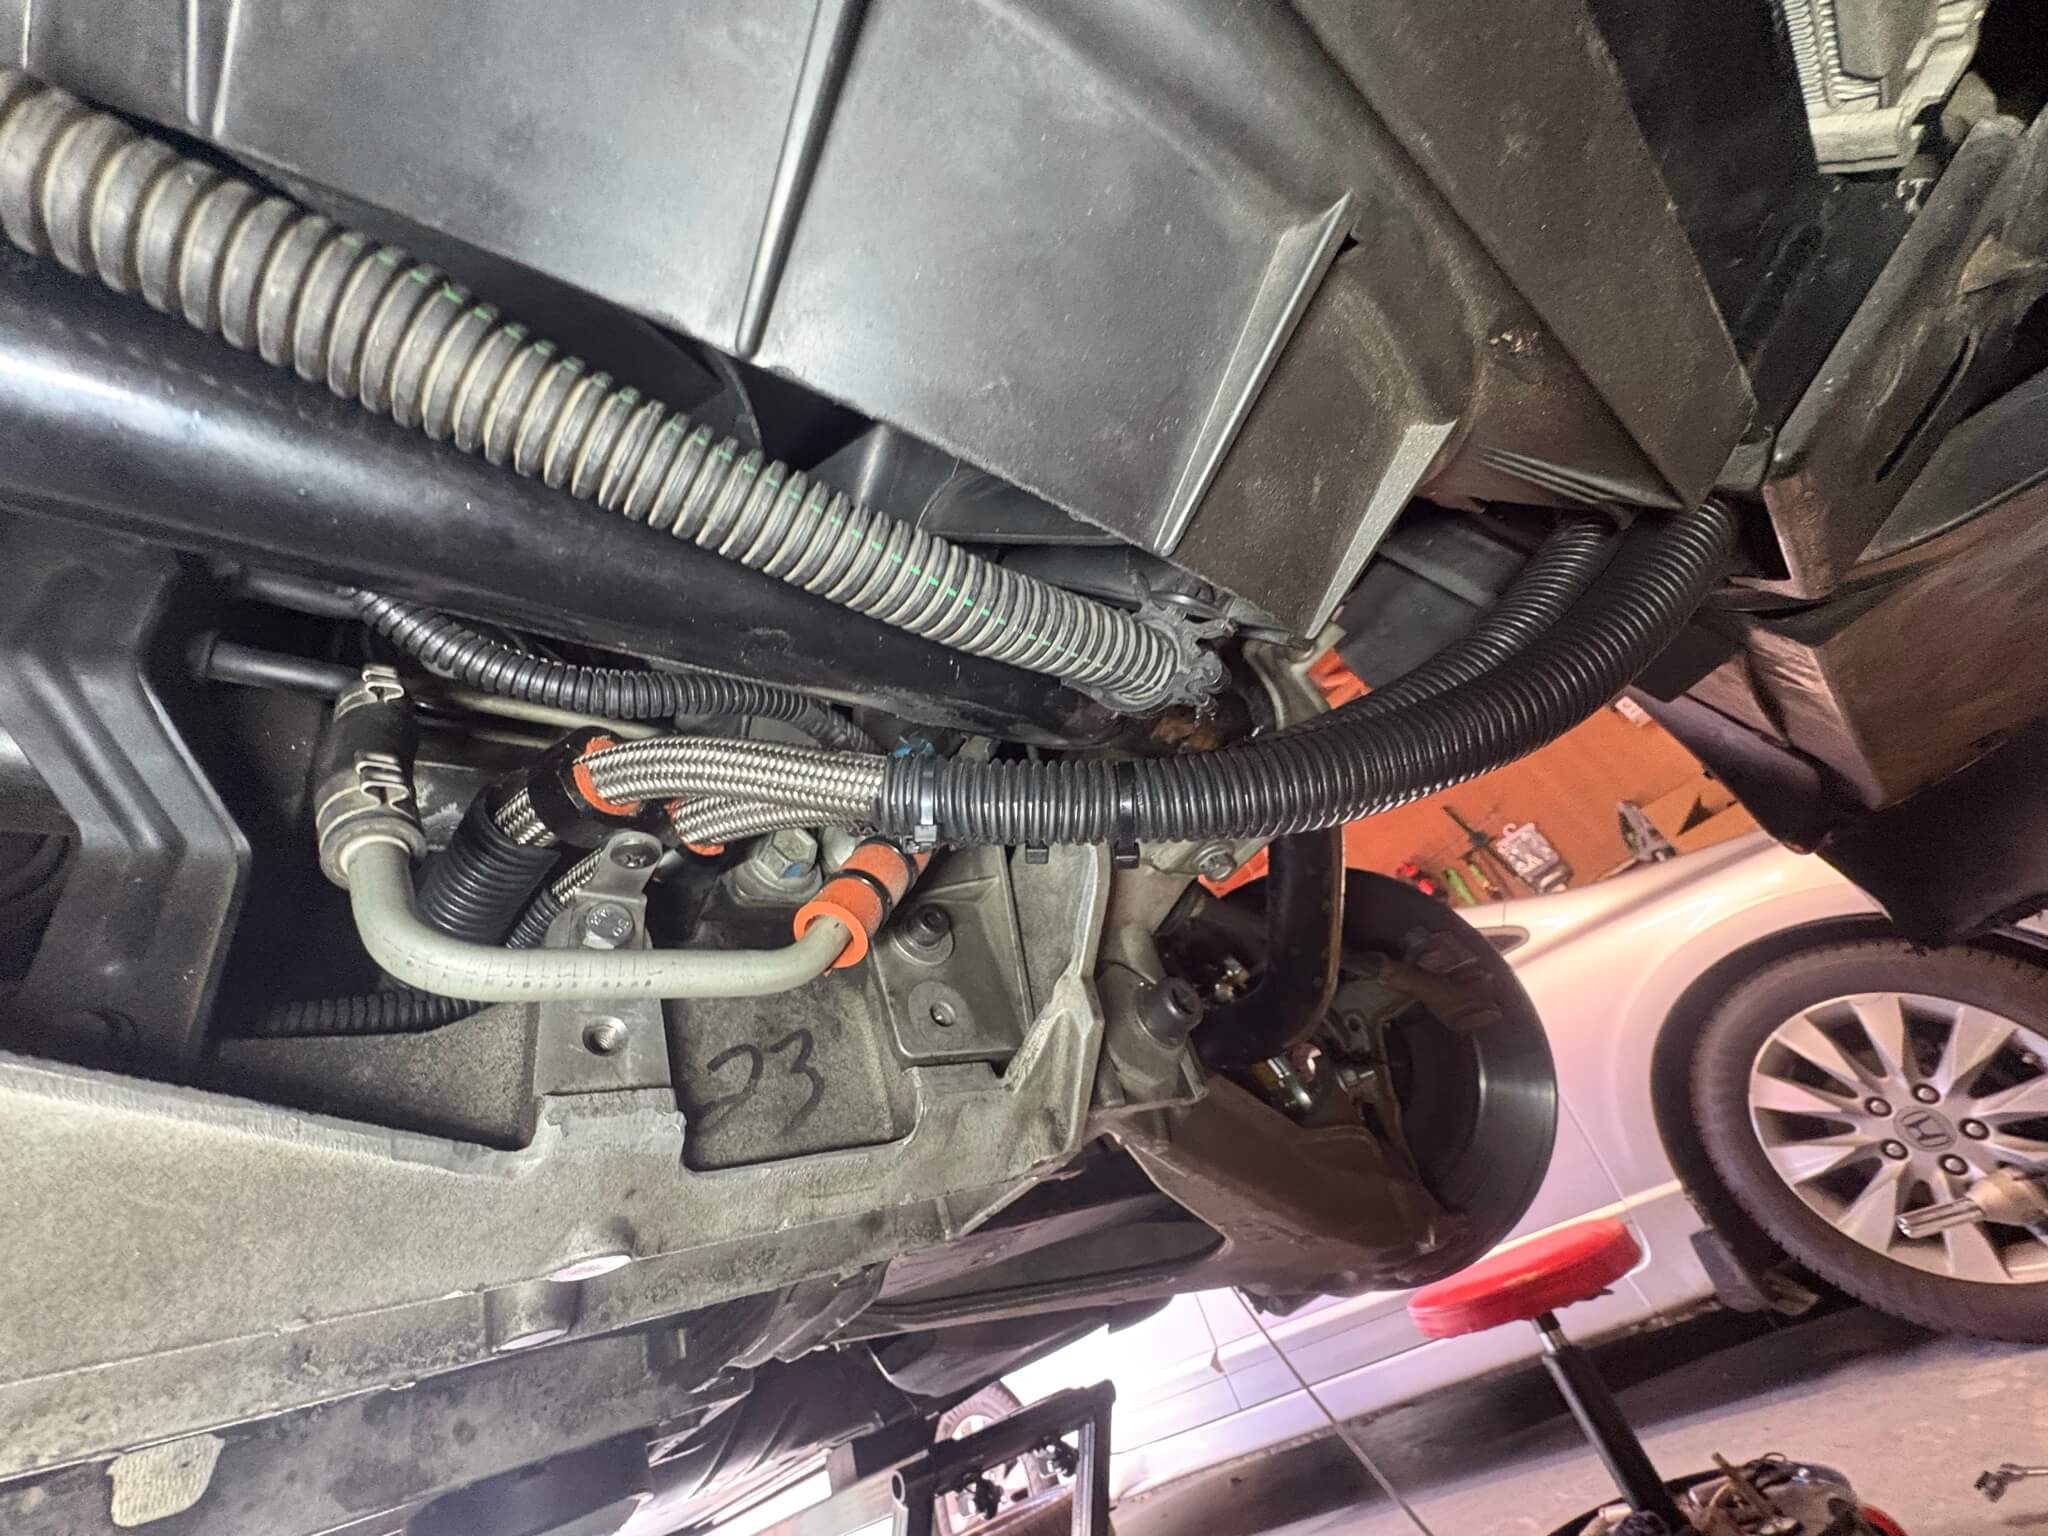

Getting the line up to the radiator shroud is the worst part, but still not that bad. You can actually reach for the line from the top side of the motor bay and push it through the hole you’ve made in the shroud.
Ok… Installing the fittings. If you don’t know how to do this and DON’T want to do this, you can run both of your lines to determine the length you need, then cut them with a little margin left on the length. Take the fittings and your cut lines to your nearest hydraulic line shop. They should be able to professionally combine the two, if you’re not confident in your abilities with the lines. However, as a disclaimer, you may need to adjust the routing on the lines. I’m not sure the way I routed mine would allow the extra constraints of having the fittings already installed. YMMV. After the lines are run, start installing the fittings and tightening them down on their respective mates. Again, German spec here… you don’t want to damage or crush anything excessively. Now, install the small line bracket combined with the line separator. I used some high temp silicone rubber cut to length to fit inside the line separator, just to protect the line from abrasion. Last (install) step: Time to modify the lower air dam with a razor. Just slice a small strip that lines up with both of the brackets, where the dam would normally install.
Make sure everything is nice and tight, and PRIME your car! You might need to add some extra oil to fill the new, additional volume of the lines and cooler. Corvettes have a flood mode where, while the car is off, you floor the accelerator and try to start the car. It will build oil pressure without starting the car. Do this cycle a few times, then start the car and verify your oil pressure! Let the car get up to temp for the thermostat, and check for any leaks around all the fittings. If there’s no leaks - turn your car off, lower your car, and drive it! Keep an eye on your oil pressure and enjoy your new cooling setup. Where the car was pushing 280F oil temp during 85F+ ambient temps on the track during 20 minute sessions, I usually see a max of around 250F. This is with 15W50 oil, so your results may vary.